VPN - Set Up and Connect Using the Cisco Secure Client for iOS

Step 1

Install the Cisco Secure Client from the App Store.

*Note: If you are currently using Cisco Secure Client for another VPN, you do not need to reinstall the application. You only need to add the new profile, as shown in the following steps.

Step 2

Open the Cisco Secure Client app.

Step 3

Tap Add VPN Connection.

Step 4

Enter a Description name for your connection, then tap Server Address and type vpn.colorado.edu, then tap Save.

*Note: Advanced users and system administrators should enter vpn.colorado.edu/limited in this field. Custom VPNs in the format of vpn.colorado.edu with /thecustomaddress appended should also be entered in this field, if applicable.

Step 5

The new connection will be created. You may be prompted to create a VPN profile, but you can skip this for now.

Step 6

With the connection selected, tap the On/Off toggle.

Step 7

The Federated Identity login screen will open. Enter your IdentiKey username and password, then tap Log in.

Step 8

You'll be prompted to authenticate with Duo multi-factor authentication to finish logging in to VPN. Learn more about Duo MFA.

Step 9

If using the Duo push option, click Approve.

Step 10

If prompted to confirm this is your device, select Yes.

Step 11

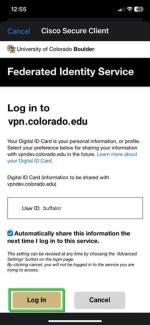
Confirm your information with Federated Identity and tap Log in.

Step 12

You'll be returned to the VPN connection screen in the Cisco app. It will show the toggle as turned on.

Step 13

To disconnect, tap UCB VPN, then tap the on/off toggle.